Saturday, January 26, 2008

Off-Topic #1

Is it a good idea for this blog to start hosting off-topic posts? James, please chime in with your thoughts on the matter. I see a number of reasons why it's no big deal if we drift into non-CG posts but I also see a few reasons why it's maybe not the best idea.

Maybe it's a question more easily answered with a concrete example. In that light, I present two tidbits in our first (and maybe only) "Off-Topic" segment:

  • How to "solo" layers in Photoshop.
Option-click the "eye" in the layers palette. On a daily basis I use Maya, After Effects, Photoshop and Illustrator. Each is a brilliant application in one regard or and a complete pile of c#$p in another regard. You sometimes wonder if the application developers even know that there are other applications out there with things that might be worth "borrowing."

On that note, one great tool in After Effects is the "solo layer" command. There's a small radio button in the AE composition window that, when you click it, turns off every other layer. It's a nice, simple thing that quickly becomes part of your workflow. It's great for troubleshooting and overall very nice at helping you figure out complex compositions. Well, why the hell doesn't Photoshop have this option? I mean, they're made the same company, you'd think that some smarts would flow between the two development teams, right? I've pined for a long time for this simple thing...

Turns out it's been in Photoshop since, like, version 4 or something. And it's just that simple, option-click (mac) on the eye in the layers palette to solo your layer, option-click again to un-solo. It remembers your initial state as well, meaning that if you have some layers turned off already when you solo a layer, when you un-solo that layer, the already-off layers remain off.
Nice job.

  • Evo and Proud
I've just started reading a new blog called "Evo and Proud." It bills itself as "Peter Frost's anthropology blog, with special reference to sexual selection and the evolution of skin, hair, and eye pigmentation." I suppose it is all that. To me, it's just interesting.

One of my best friends is anthropologist at Emory U and I'm kind of a pop-science nerd. Give me some Pinker, Pollan or Carl Sagan and I'm a happy guy.

Well, that's it for now. The weekend kicked my butt with MEL class and my re-cutting my reel so I've nothing at all good to show, project-wise.

Cheers.

Tuesday, January 22, 2008

Maya Tip of the Day #3

Or maybe this is "MEL Tip of the Day #1." You be the judge.

So, I'm starting up a MEL scripting class through CGSociety. I'm pretty excited, though it will definitely take a small chunk out of my free time and slow down my work on this project. My hope, however, is that at the end of the class I've have a few more tools at my disposal that will speed up my work on the project as I come out the other side.

From time to time I'll try and post some MEL goodies and here is the first:

JEdit.

JEdit is a text editor, Java-based so it's platform agnostic and highly customizable. I played with it a little bit and liked it but I didn't love it. There was something about the Java feel that didn't sit right with me. I played with a couple others, namely TextMate and TextWrangler and found them decent enough but uninspiring (this is on OSX, so the biggies like Crimson Editor and MEL Studio Pro aren't in the running).

And then I kept crashing Maya. I'd type some code into TextWrangler, copy it, command-tab to Maya, paste it, run it, command-tab back into TextWrangler, type some code...rinse and repeat until Maya said "ENOUGH!" Maya does not like rapid-fire application switching.

...sigh...There's gotta be a way to execute code in Maya right from within a text editor, right? Right. And the right choice for that is JEdit. Remember how I said it was way customizable? I wasn't kidding. Following a blog post on Sean Nolan's site, I found a tutorial on highend3d written by a guy named Ron Bublitz, who is way, way too smart for me to really get a handle on. He wrote up a couple macros and a tutorial on how to configure JEdit to send your script into Maya and have it executed there. Seriously.

I even did it. I typed "polyCube" in JEdit, clicked a button in my toolbar and there was a little wireframe box in Maya. Magic. Will wonders never cease? Not at this rate.

Tip of the hat to Mr. Bublitz and JEdit and keep yer eyes peeled for more insane scripting action coming your way. I may even write some MEL that would make TWO little boxes appear in Maya! That would be something...

Monday, January 21, 2008

Same Bird, Different Shader


Just for fun, here is the same model as in the previous post, with a blinn shader, using Final Gather and an IBL Node. (Nothing fancy, but it shows the look of the model a bit more polish to it.)
*Disclaimer: This is just to get a sense of how things are coming along. The final Model will most likely not be a solid blob of metal..

Bird Number One WIP 7

Well, I am happy to say that the first phase of modeling on the bird is complete. All of the basic shapes are in place, and in a good relationship to each other. Next is to refine these basic shapes, and add details such as seams and bolts.

I had to redesign the legs and feet so that they would be able to grasp things, as well as function on uneven surfaces. To do this I used a skeleton from a raven (Don't worry, a picture). I chose a raven, because I had a run in with one Thursday afternoon on my way through a small park in San Francisco's Financial District. He was huge, and totally un-phased by humans!

The raven run-in led me to Google ravens once I was in front of the computer. After reading a few articles and seeing some cool video, I was sold. I plan to use raven footage for reference once I get into rigging and animation.


You may also notice that the beak has been redesigned. After modifying the original design so heavily, it just didn't work to hang on to the original beak. This one too is (loosely) based on a raven's beak.

Comparing this to the original artwork is a real shocker. Nigel came through for us with a cool drawing - And I will admit this is not exactly the same bird. Many aspects of the design had to be modified to allow for certain types of motion to even be possible. As one element was changed, others followed to compensate - In an attempt to keep the look interesting. In the end I think this design is also successful - And I have tried to pull inspiration from Nigel's work.

Before I continue to develop this model, I will be taking some time to clean up my file. Things can get quite messy with this many individual pieces.. And so I want to make sure my Naming, Groupings, Pivots, and UVs are making sense before continuing on.

As a result I may not have anything to look at for a while. But have no fear - I will be working hard - and will post some new pics when I can.

My UV Layout Post

So, James has been ruling the roost (pun completely intended) here with all of his awesome bird posts and I've been largely silent lately. Mostly I've not been able to work on the project as much as I'd like and also I've been doing the utterly unglamorous job of laying out UV's on the three buildings.

But it is time for me to post again. Here are some pictures of UV's.


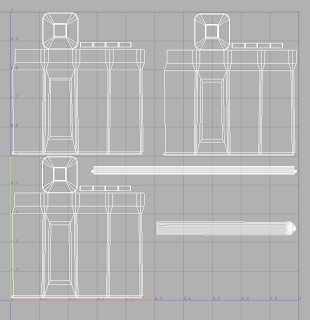
The base building UV's.


The top railing. This could easily be a part of the main building but as birds are known for hanging out at the top of buildings, this seemed like a place for its own texture.

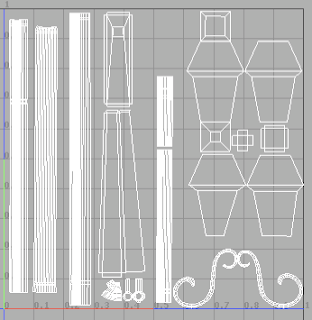
The pipes & lantern. The lantern is very low-rez at the moment and if it has any prominence in our shots will surely be art directed with more care than its gotten so far. This works for now though.


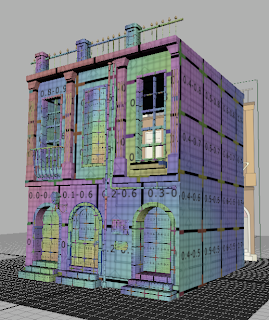
The first pic shows building two with a UV layout texture applied to it. The texture is hella ugly by most standards, but it's designed to make laying out UV's easier. The grid pattern & color cycle work as a visual guide, showing you how your UV's look on the model, where there's stretching, relative scale, etc.

I've broken this building up into 6 texture groups. One texture for the main building, one for the three lower doors & steps, one for the top railing, one for the windows, one for the pipes & lantern and one for the signs. This texture assignment is somewhat arbitrary as our shots aren't blocked out yet. I wouldn't be surprised if, on a shot-by-shot basis, the texture sizes & assignments change pretty dramatically. For background shots, for example, this whole building could be taken care of with one camera projection. On a close-up, any one door or window might actually need multiple textures.

I only screengrabbed pics of three textures but they're all there, on all three buildings. Laying all of these out like this was pretty tedious but it gives us the flexibility we'll need later on.

Cheers.

Monday, January 14, 2008

Bird Number One WIP 6


I have finished the wing modifications - Now the wing has mechanisms to control all of different movements it will need. Also I have started on the upper thighs - refining their general shape and tying them into the sub frame of the bird.

Next is to add the lower legs and then adjust the tail feathers as they meet the sub frame of this creature. I have included renders without the wings or body plates to show some of the underlying structure.

As the bird will be in flight, it is important that it be able to withstand scrutiny from many angles.

I do want to refine the head - Especially the eyes, but that can be addressed in the next stage of tweaking and refinement.

Almost done with this phase of modeling!

Saturday, January 12, 2008

Bird Number One WIP 5

This post is just for fun. I decided to render a couple frames with Occlusion instead of just doing screen grabs. It a great way for me to see just how much (or how little) detail is needed in certain areas.


As you can see I am a little further along with the wings, and the shoulder integration is in a good place. The last thing I need to do (at this level of detail) to the wings is to add a small indentation for the tabs on the wing sections so they can slot into each other when the wing folds.

Then its onto the legs. They will need some additional development & design.

After that I have a boiler to add into body of the bird, and some details to work out regarding how the tail section is structured. I have built a sub frame through much of the birds extremities to help with this, but I have not finalized certain aspects of how the tail integrates into this frame. Also I would like to add some tiny actuators for the top two tail pieces.

After that I will give a good once over to model - and maybe revisit the eyes. Then I should be finished with this stage of modeling.

I may begin to layout some of the UVs before continuing to model - As I may be jumping into Mudbox to add a bit more of an organic line to the design overall. (Yet to be decided.)

In the following stage I will be refining the profiles of each shape, as well as adding all of the nuts, screws, washers, seams, etc that make something like this really fun to work on. I got the idea today to add some sludge around some of the moving parts - Fun!

I feel like I am past the most challenging parts of modeling this creature - Now that the design is in a good place it has started to flow.

Bird Number One WIP 4


Well I finally have a general profile and set of proportions for this bird that I am happy with. As you can see I still have a lot to do, but I think the main structures are in place. Next I will work on tying in the shoulder to the first wing section and then move down to the legs, which need some additional structures to allow for greater articulation.

Bird Number One WIP *Design Changes

After a good deal of deliberation and discussions all around, here are the re-designed wings for our bird friend courtesy of Nigel Sussman:
As you can see they are greatly modified functionally and structurally. I will be working on these this weekend, and will provide posts once I have made some headway.

It is too bad to have to lose the work (rigging-wise) that was already put into the previous wing design, but it was helpful in exposing some limitations in that design, for our purposes.

As is the case with all of the concept art, this is not set in stone but rather a guide, many finer details will be finalized during the modeling process itself. That being said - This design will serve as the structural and artistic basis of what will be (I hope) the final wing design.

Sunday, January 6, 2008

Bird Number One WIP 3

Here are some screen grabs of the progress today. I was able to add most of the broad facial details in as well as (very) basic wings and a tail section. The tail and wings will be refined a great deal - But I needed something simple to get things started.

I modified some things in the model to make him feel a little more aggressive especially around the beak, which is larger than in the original art. Also I decided against the small metal supports on the sides of the mouth, as I want this guy to look like he could really open wide and BITE!

The wings were today's real head scratcher.

As I had mentioned in a previous post - Since this creature is metal - I cant have any pieces interpenetrating - And with the complexity of the wings , that was one tall order.

I didn't have a drawing of this in any type of bind pose, so I was having a hard time understanding how the wings would move as they were folded and unfolded.

I opted to create the scissor frame at a fairly high level of detail and then rig it. By doing this I can test the wings as they open and close, and by rigging a more detailed piece, I wont have to do it all over again later. (no user friendly controls or anything for now - Just basic parenting)

The scissor action on the wings is really creepy..! But I think I will need some additional support structures for them so that they seem strong enough to support the bird in flight.

I then keyframed the wing unfolding so I can check it through its range of motion while I refine the structure of the wing panels.

Once I had this set up I noticed that I will need to do some extensive re-working of some elements of the design - especially with these wings. Stay tuned.


Saturday, January 5, 2008

Bird Number One WIP 2

Due to the complexity of this model, I am using a hybrid approach here - Generating geometry from curves, edges, positive thinking.. Hey - I'm not picky. For now, I am concentrating on getting the basic structure sorted out.

Maya 2008's smooth preview is very helpful - and the features Barry mentioned in his last post are some of the main reasons I decided to bite the bullet and install it a home.

(That and the fact I have been using it at work since its release.)


As you can see things are not really far along just yet, as I am having to flesh out some aspects of the design as I go .


Because this guy is mechanical, as opposed to organic - I have to make sure all of these bits and bobbles will move correctly once assembled. That means a lot of minor adjustments as I rough in these pieces in a way which serves the design while allowing me to get the performance I need in the end. The frames here have the poly smooth preview on them for clarity - but the mesh I am actually working on can be seen in frame 1.

Also, I feel like the original concept bird is a little too friendly, so I may be tweaking the overall proportions some as I go.


Death from above!!!

Maya Tip of the Day #4

The subtitle for this post is, "Getting To Know Maya 2008."

I'd planned on being cautious about moving into Maya 2008 on this project. It started, back in the "way-before time" on Maya 8. We were wishy-washy about moving onto 8.5, so wishy-washy in fact that Maya 2008 was out and about by the time we upgraded to 8.5.

Well, lo and behold, I look at James' latest post and, "what the hell!?!" Holmes is rocking the bird in fully up-to-date '08 style. Thusly, I'm happy to present the following post.

Unlike James, who's actually working in the program, I've only opened it a few times and clicked around on some of the "What's New" links. Two things that are new, that've drawn my eye, are the Poly Smooth and the "X-Ray Active Components" shading option.

I've not yet spent much time with the new Poly Smooth but it may be usable enough to replace the Connect Poly Shape scripts that I've come to know and love. Well, maybe not entirely replace them as they do lot beyond simply creating a smoothed proxy but it looks like a nice little addition to the toolset. I look forward to putting them to a more extensive test. The ability to quickly toggle the low-poly cage on-and-off, and to manipulate either it or the higher-poly model is great.


As to the new X-Ray shading option, I think it works for me.

When I'm modeling, I spend a lot of time jumping from X-Ray to regular flat shading. I'm always having to check if I've selected an extra face here or a stray point there. The gesture to toggle X-Ray shading via a marking menu is pretty damn ingrained in my workflow at this point. But this new shading option, which doesn't X-Ray the entire shape or scene but only the selected components, it's pretty clean. One of the tenets of creating usable interfaces is, "only show the things that are important At This Moment." The old X-Ray option, when you were trying to check your selection, showed more than you needed to see. It showed you what you didn't want selected as well as what you did want. Too much information.

Having said all that, I don't think I'll take the old X-Ray out of my toolbox entirely. This new option won't do anything for you if you're trying to add to your selection. In that instance, X-Ray is just what you need.

Okay, I've gone on long enough on very small subjects, but stay tuned for further "Getting To Know 2008" posts in the near, or far, future.

Cheers.

Friday, January 4, 2008

Bird Number One WIP 1

Nothing too exciting here, since I am at the first stages of modeling this guy. One thing of note is that I don't have an orthographic side view, so when I sliced and diced the original concept art to create the image planes (see screen grab) I created one from the perspective view. These image planes are hooked to 3 ortho cameras within the scene and on separate display layers, so that they can be easily toggled. Also, I am not really counting on these image planes to be 100% accurate (to scale, etc.) - Since some minor elements may be changed as I go anyway. The perspective one is something to look at while I figure out the best way to tackle this model.

Thursday, January 3, 2008

Bird Number One Concept Art

Here is the concept art for bird creature #1, provided graciously by Nigel Sussman. Stay tuned as this progresses into out first completed character.