Sunday, November 25, 2007

A Few Building Shots

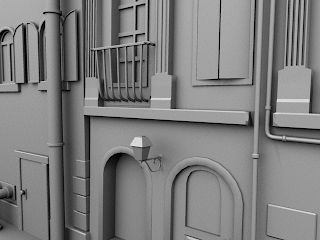
Here are a couple quick AO renders of two of the buildings I've been working on. I'm happy with the way they're coming along but there's still a ton of work to be done on them.
Kinda neat, huh?

Ugly faceting on the doorway curves, way too sharp corners on the columns and a ridiculously under-modeled lantern.
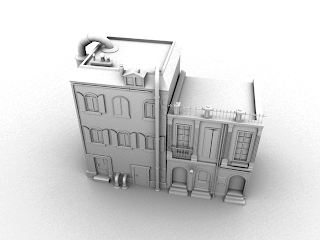
Nope, neither building has a backdoor, or a back wall, or even a floor. I suppose I'll never make it in architectural previz.

Shutters and doors that look like ugly slabs of drywall.
I honestly don't think I needed to model the fluting on the columns on the right. I may rebuild them without it and add the details in Z-Brush later.
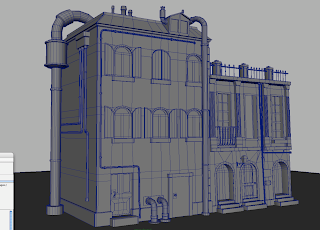

And a quick screengrab of the wireframe on shaded.


One thing I'm going to need to address is the uneven level of detail on different parts of these buildings. If you look closely you'll see some beveled edges here, some sharp edges there, modeled details on some parts, plain, flat polys on others. There is some method to my madness though. After I finish one more building, the plan is to unwrap them and take them into Z-Brush where I'll add some distressing and some modeled textures. The door and window edges that show faceting because there are too few polys will be smoothed and dinged up a bit. I'll add some weathering to the columns on the right-hand building and texture the shutters and windows. After all that I'll export a Normal Map and see what that does for me. I'm crossing my fingers that that solution works out. One thing I'm not sure how to handle is how to combine a Normal map meant to simulate textures and the normal information you get when you throw an Average Normals on a few polys or when you manually set normal angles or perform a Smooth Edge command. I'm confident someone, somewhere has explained this. In time I'll track it down.

Cheers.

Saturday, November 24, 2007

Modeling Tools (Maya Tip of the Day #3)

Today we'll be looking, briefly, at two tools. The first is from the Maya Bonus Tools toolset.

There are a ton of Bonus Tools. I installed them all when I had the option to because, well, why the hell wouldn't I? They're tools and they're bonuses. I like both. But there are so many that I spent more time being daunted by the long list than I do actually using them.

(that's like 30 tools or something!)

I'm sure there's documentation for all of these but I've not looked for it. What I was looking for though was a way to pivot a piece of geometry around one of its edges. It's a window shutter on a building I'm modeling and I had it placed right where I wanted it, then decided that I wanted it open, just a little bit. I knew I'd downloaded a 3rd party tool that was built for this but I couldn't remember what it was. So on a lark, I checked the Bonus Tools.

It's in there. It's called "Move Object Pivot To Component Center." It's a long name but it does just what it says. I selected the edge I wanted, ran the command and voila, the shutter was cracked open. After that, a quick Center Pivot gets things back to normal. That one's heading to a marking menu soon.

After finding that, I was still wondering what tool I'd previously found to do this. Well, it's Local Tools by Henry Korol. It's actually in one of my shelves but because I've yet to make custom buttons for my shelves, it gets lost easily.

The good and bad thing about Local Tools is that it's way more powerful than the Move Object Pivot bonus tool. The good part of that is, well, it does more. The bad part is that it does so much more that it's really worth reading online documentation. I've not done that yet but I've bookmarked the page. I'm sure that it's going to be part of my modeling repertoire soon.

Cheers.

Thursday, November 22, 2007

Marking Menus

I'm not all that stoked on my building models just yet so no pics of them today. I thought, instead, that I'd share my custom marking menus.

I have three marking menus set up, bound to Option + 1, Option + 2 and Option +3. I do 90% of my Maya work on a Macbook Pro and on that keyboard, those bindings work pretty well. They're not super-intuitive and I imagine that I'll try out some other options eventually but they're fine for now. I can't easily hit the Option + 4 chord, so this set up is limited to three menus only.

The commands in each menu are all loosely related. MM_01 (marking menu one) is commonly used modeling tools. MM_02 is commonly used viewport options and MM_03 is, well, I'm not sure what to call it.

Here they are:

So, I use these tools a lot. This menu is a bit too full for me to truly work gesturally with it, at least at the moment. With more time spent using it, maybe all of the tools will become gestures. Insert Edge Loop and Extrude are well-placed, I think but I don't know that Combine really deserves the "pride of place" of being the bottom tool. I should put something that I use more often in that place, maybe the Split Polygon Tool.


This one is nice and light. I use X-Ray all of the time and both Isolate Selected and Wireframe On Shaded are easy to hit gesturally. This menu I really don't have to think about at all.

The To Edge Loop and Delete Edge/Vertex don't really fit the theme of this menu so well but it only bothers me a little bit.


These are the, "all right, let's move on tools." The set-up here works well for when I've got an element just the way I want it, I can very quickly gesture up, down and up to the right, and then move on. Ok, ok, Duplicate Special has no place being here and, frankly, I forget that it's there. I nearly always grab that tool from the Hot Box instead of from here. Maybe I should swap Combine and Duplicate Special. That actually makes a certain amount of sense, because after Combining it's a good idea to "reset" your geometry before modeling away.

Well, there you have it.

Happy Thanksgiving.

Wednesday, November 21, 2007

Not Dead Yet

Over a week since the last post, that's not great.

But I've been working on the scene in my free time and I'll have a new building or two to show pretty soon. I spent so much time earlier on modeling the clocktower (which I fear I will have to substantially rebuild) that I never got to model any buildings. So now, whether or not it's truly necessary, I'm giving myself the chance to kick out a couple of apartments. I'm quite enjoying it, though I'm having trouble integrating some of the steampunkish elements into the buildings. All of this means little without pictures, so I'll try really hard to have a picture post up this weekend.

Cheers.

Monday, November 12, 2007

A Few Random Shots

The project is, or it may be, floundering a bit...I don't know exactly, but so what? That's what happens sometimes and even if it is, it ain't over 'till the fat lady sings.

Attached are a few shots rendered with temp geometry on the buildings and the birds, with no textures and with one ambient and one point light. Never the less, I like them. I like this scene even if I can't say what story it tells.


Monday, November 5, 2007

First Round of Concept Art Sketches

We just started working with a guy named Nigel Sussman. He's a flash developer (programmer? Like I know the difference) and illustrator up in the Bay area, which is where James is now located. He's got some great illustration skills, a real strong sense of line and the good sense to realize that doing some drawings for this project was a super-cool thing to do.

Did I also mention that he hosts his site on Laughing Squid? Yeah, that means he's down with the digerati hipsters and pixetelegensia crowd.

W00t!

Thanks for coming aboard sir.

We'll have sketches up soon but I thought a shout-out was in order.

Cheers.

Essential Maya Tools

As part of an ongoing series, I humbly present Lightgirl.

This lighting GUI, built in MEL, is absolutely insane and one hell of a lifesaver if you have a scene with more than, uh, one light in it. It was built by Ben Wronsky, who I don't know personally but is apparently a Senior Technical Artist over at EA Games. Looking at this, I wish I was a Senior Technical Artist but I have to realize that for all my many gifts, I just ain't smart enough to pull off something this rad.

It's available both on his site & on highend3d.com. It's a must have if you care at all about being able to easily control the lights in your scenes. I found it while looking for a tool that would allow me to change the intensity attribute of a cluster of four lights. Without a tool like this, it's a matter of selecting one, changing it, then selecting all of the others and repeating - one at a time. This makes for lots of steps and lots of preview renders if you're trying to find a setting that looks "just about right."

Bah! All that crap is behind me now. The one caveat is that the UI isn't perfect in the OSX environment, but that's what I get for using Maya on a Mac.

Cheers.

Saturday, November 3, 2007

Why Does the Bird Have a Prussian Helmet?


I don't really know. But it's kind of funny. The bird on the top left also has a key slot on its chest. I'm not sure what key might go in there, maybe it's a wind-up key to get the bird's interior clockwork mechanisms going. Maybe it's not but the key slot would be really ornate, with filigree and etching and cool stuff like that. It's fit into a torso that's more utilitarian than aesthetic. The torso's made up of a bunch of bolted on panels, or screwed on panels, with holes cut out for the feet and head.

The wings don't work at all like real bird wings but they pivot out from a couple of axles perpendicular to the imagined spine of the bird. The lower right wing is made up of lots of overlapping metal leaves (feathers).

Yeah, so that's that.

Thursday, November 1, 2007

Moving Forward

I've talked some smack about moving onto the animatic but after some discussion we've decided to put that aside for a bit. We've also shelved, for a little while at least, the idea of doing detailed styleframes for our shots.

Below are two super-rough styleframes that we did, one apiece, earlier this week.


While there are some similarities, (both have bridges, that being the main one) the two frames are pretty different in a lot of ways. Seeing these two frames side-by-side like this could've led to a knock-down, drag-out conversation about art direction and intent but we decided to avoid that talk and just focus on a scene.

We're picking the first scene, and why the hell not? For that scene, and for the next couple scenes, we're really gonna need some bird models. Therefore we're in bird concept mode.

It's tricky, this concept art thing. I've been sketching away and getting lots of crap. Hopefully some gold will shine through eventually. From there it's the simple matter of modeling and rigging. Yeah, those will only take an hour or two each. Then, after another hour or two, the whole film will be done.

Heh.