Well I think another technical issue has been fixed. My entire account
was in limbo for a while but things seem to be going smoothy now. Even
mobile blogging and blog via email seem to finally be sorted. This may
seem unrelated, but it will mean more frequent, more consistent posting
on my part.
Thursday, June 28, 2007
Background Elements 4


These two renderings are from alternate angles within the scene. (Not a part of the first shot.) I decided to include them here so we could get a look at the world from their point of view.
Wednesday, June 27, 2007
Background Elements 3
This is Frame 139. The camera has just swooped under the walkway (visible at the beginning of the shot) Here the background elements begin to establish our setting, as well as creating an additional layer of visual interest and texture by breaking up the skyline.
 This is frame 250. The camera has begun to descend into the town square area and the clock tower begins to take over as the main point of interest.
 This is frame 941. The camera has just come around the clock tower and is headed through an open door (not visible in scene). Here the background elements are included to maintain visual and stylistic consistency while enhancing the overall interest and composition. In addition these dark shapes looming ever closer to the viewer enhance the drama and foreshadow things to come.
 This is frame 1156. We have just seen our heroine for the first time. In contrast to the preceding frames, here the sky is wide open - allowing the viewer's main focus to be on the mechanical bird as it lands on the building. At this point in the shot the movements of the bird take center stage (quite literally). Background elements here help to enhance the depth of the shot.
 This is frame 1271. This is near the end of the shot. What was a sunny and happy town has become somewhat foreboding. Here in the shadows of the buildings and clock tower we begin to sense the smallness of the our heroine.
Background Elements 2
Here are a few renderings of specific frames from our first scene with some background elements added.
First though, you should know a few things:
(DISCLAIMER)
All (or nearly all) of the models you see here will be reworked significantly. The purpose of this scene in its current state is really to help Barry and I with blocking and general shot composition.
As such everything you see here is only an approximation of the final scene. Modeling, texturing, lighting , etc. All take a great deal of time - So by working loosely at first we can make broad changes that would be difficult further down the production pipeline.
A great example of this can be found in the shadows that you will see in the scene. By working with very simple shapes as stand-ins, we can quickly make adjustments to the angle of the shadows, or their color..Without spending a great deal of time on the task. Although these shapes aren't much to look at, they tell us important things about the nature of the final shot and help us to determine which areas need the most time and detail.
First up is a rendering of the first frame of shot 1 without any of the background elements.

Next is the same frame with some of our newly created background elements in place.
 In the next post, I will show a few more key frames with the background elements included.
Background Elements 1


Well it's been a while since I have posted, and I have some new images to share. These are some early designs for a windmill type device that will serve as one of the props in the background of our first shot. The shot is extremely wide, and covers a very large area, so it is essential to have objects in the background of the scene to help establish mood and scale.
These are very WIP..But I thought they would be fun to share. In an upcoming post you will see these as well as a few other new items that have been created for this purpose in context through a few rough renders of our scene as its stands now.
Monday, June 25, 2007
Been Doing Some Modeling
I've walked away from the camera, for the time being. Instead I've been working on the clocktower, which is the central feature of the plaza we see in the first shot.

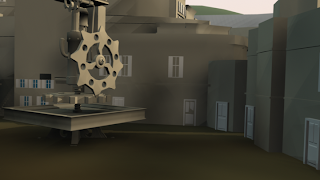
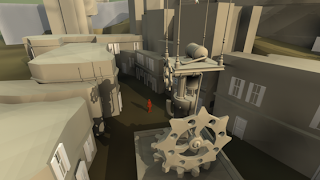
The first two stills are from the active camera view, the third is more of a "money shot" to show off some of the upper parts of the tower. It's still far, far from being finished. I had a couple of concept drawings to work off of, but they were unspecific for some of the features so I spent a fair amount of time trying this & that out as I modeled.
The obvious question is, do the gears work? Uh, yeah, they'll move and all but they won't really "work," so to speak. No gear will actually be driving anything else but they'll all move as if they have real purposes. That's the plan for now, at least.
Tired. Goin' to bed now. More screens in a day or two.
Saturday, June 23, 2007
Back On The Horse
Well, the project's slowly creaking back into motion.
I'm kicking out a playblast in the background as I type this. I'm not using the camera rig that I've been struggling with for the past several weeks. Meh.
Once this playblast is finished, I'll be kicking it over to James and we're going to get started modeling buildings. Ooooooo. I'm excited to be modeling soon. The playblast had to come first, though, so that we'd know exactly what needs modeling and what corners we can cut (literally, in many cases).
I'm not going to post the quicktime that comes out of the playblast, because I just don't like the Google Video embed that happens. It's ugly. Oh well.
And the 'blast is done and I'm outta here for now.
More updates to come.
Tuesday, June 19, 2007
Broken Cam
It's no longer being called "TricksyCam." It's now "BrokenCam."
I've not been testing the changes I'm making to the script as throughly as I should've been. Now, several steps on down the path, all sorts of transform controls are conflicting with each other.
The major issue is that the motion path is messing with the pivot points for Roll, Tilt and Pan.
The pivots are staying at 0,0,0 - the place where the camera was created. When the camera's offset by the motion path, the pivots should leave 0,0,0 and go wherever the camera is. Centering the pivots doesn't work/change a thing.
This has to be a problem plenty of other people have dealt with, but it's incredibly frustrating to meet right now, this far into the process.
Monday, June 18, 2007
Ten Days, No Posts
...sigh...
Have no updates or progress to show for the last little while. Seems like that's the story for a while now but the project is not dead. I repeat: It is not dead.
Just sleeping...
Have no updates or progress to show for the last little while. Seems like that's the story for a while now but the project is not dead. I repeat: It is not dead.
Just sleeping...
Friday, June 8, 2007
The GUI saga continues
This week has been just as busy as the last, meaning work on this thing is lots of little fits and starts and very, very little sustained attention. I'm really ready to get this GUI nailed down and move onto the next part of the shot, especially as I did have a little bit of a breakthrough while doing sketches for the central clocktower. Hopefully I'll have the chance to scan my drawings and post them up before too long. I wouldn't call them final concept art or anything, but they've got me excited about the tower. I'd been feeling lost on it for a while now.
As ready as I am to move past the camera GUI, one thing about it is really nice, and it's that I'm taking the time to build this thing correctly, right from the start. One of the difficult things about working in production, on "one-off" sort of spots, is that so many of the elements we build feel like hacks. They're built just for one shot, or to be used at only one angle - fake 3d stuff, for example. These hacks are fine most of the time, but they come back to bite you when the client wants your 2d ribbon, faked to look 3d, to wrap around the star of the show, or push in a completely different direction. Had it been 3d in the first place, no sweat, but it was built in 2d by the designer and used that way in animation.
Often enough to be frustrating, the hacks used because someone felt like there wasn't enough time to do it all-the-way, end up costing the same amount of time on the backend.
All that's a long way of saying that it's fun to put the time into this GUI right at the start and build it a bit more fully than it really needs to be for the shots we have in mind. I'll try to post a new screen of it soon, but this weekend looks very rough in terms of free time.
Monday, June 4, 2007
Too, Too, Too Busy
Work on this project has nearly, but not entirely, ground to a slow burn. Not to a "halt." I didn't say "halt" and I'm not going to.
I'm still in GUI mode and I'm somewhat embarrassed to show how little progress I've made in the last three days as it only represents about 3 hours worth of work. Nevertheless, I need to stay in the habit of posting here, so here's the updated GUI.

There's what, three extra controls on there?
The Wander on the camera is a really nice effect that I grabbed from Richard Morris over at The Jackal's Forge. He put up a great tutorial on building a very detailed, multi-variable camera shake utility. The Wander I'm using here is actually what he calls "Destabilize." Of the four shaking functions he describes, this is my favorite. It gives the camera a very natural-feeling sway that you don't really notice until you turn it off.
Moving on from here I'm going to add a couple of sliders to control the frequency and intensity of a more traditional "jitter" camera shake. That's not a ton of work, assuming that I can get a block of time to do it in, and from there it's back into the scene proper, using this rig to nail down the camera move.
Cheers.
Friday, June 1, 2007
I'm a Freakin' UI Designer

This week has not been the most productive week ever, but I did get busy trying to make a good control rig for our camera. It's been pretty fun and my crash course in MEL scripting is just impressing the hell out of me in terms of how usable Maya can be once you put in the time to figure it out.
The above rig is as simple as they get but it does have a check box that suggests that I may, in fact, be awesome. I'd check it.
This GUI and rig are, arguably, overkill for what we need the camera to do in this shot but this is an opportunity for me to learn how to make these things and make them useful. So, some overkill is just fine in the long run. It's all helping me in the end.
Crazy busy weekend coming up, but my goal is to make a much fancier GUI and then move on to dialing in the camera move.
Subscribe to:
Posts (Atom)